Good hiking boots are a crucial part of every hiker’s equipment. They can make or break our outdoors adventures, so every smart hiker needs to know the basics of how to choose hiking boots the right way before shopping around.
The good news is we already did all the “number crunching” for you.
For you it’s all about asking the right questions and letting not only the salesmen but the boots provide the answers. Next time you’re in the outdoors store, you’ll know exactly where to look and what to ask. And once you’re set on a model, go to GearSnag to find out some of the best deals on hiking boots.
WHAT ARE YOU GOING TO USE THEM FOR?
IF YOU PLAN TO HIKE IN MOSTLY WELL-KEPT TRAILS
Well-kept trails and light packs spell low/mid-cut hiking boots. Their uppers (everything above the soles) are made of leather and fabric, providing cooler feel and plenty of breathability.
Plan B – rain and heavy backpacks
GoreTex socks or waterproofing application is our best bet against the rain. For heavier loads we want more pronounced lugs (bumps on the outsole) for better traction and higher cut for better ankle support.
IF YOU PLAN TO INCLUDE ROUGHER TRAILS
Ankle-high boots offer enough comfort and protection during aggressive dayhiking or light backpacking. We go for leather/fabric or split-grain leather, depending on the “rough factor” of the trail. Go with waterproof (but breathable) liners for damp weather or well ventilated and porous models for desert-like conditions.
IF YOU HAVE THE HABIT OF GOING OFF-TRAIL
Goat paths, swampy terrains, patches of jagged rock, step descents all demand full-grain leather uppers and support above ankles.
For longer trips with heavier backpacks we want optimal flex for comfort and blister prevention, and protective rigid outsoles to go against the sharp rocks.
These hiking boots will take time to break in, so be sure to give them a proper trail run BEFORE embarking on a longer hike.
WHAT’S YOUR SKILL LEVEL?
Leg muscles “optimized” for hiking can only come from enough time on the trail.
Those muscles make the world of a difference. For example – experienced hikers will also have more resistance to rolled ankles and tweaked knees.
The rule of thumb is – the more your “hiking muscles” strengthen the more support you can shed off your boot. As your feet get stronger you can move towards lighter hiking shoes.
9 FEATURES YOU NEED TO CONSIDER
The most important ones are these 5:
1. Weight of the boot – There’s a saying among hikers. One pound on the foot equals five on the back. The heavier the boot, the more work for our legs.
2. Waterproof or not? – Water in our boots is a definite no-no. It’ll cause odor build-up, blisters and it’s generally uncomfortable. So, we should include waterproof materials that allow our feet to “breathe” and let perspiration escape. GoreTex membrane is all the rage nowadays, provided the temperatures aren’t too high.
3. Arch support – Proper support won’t let your feet flatten out under pressure, saving you a lot of pain. With high arches, you might consider buying additional orthotics insoles.
4. Injury protection – Two most common hiking injuries are twisted ankles and stubbed toes. Therefore, the rougher the terrain, the more ankle support we’ll need. Inclined surfaces will punish our toes for choosing a hiking boot without enough free room in the toe box.
5. Load support – Heavier backpacks require sturdiness and flexibility. We need a full range of motion, but also the kind of protection that’ll stop our feet from bending too far backward or forward.
Additionally, there are some other aspects worth to consider:
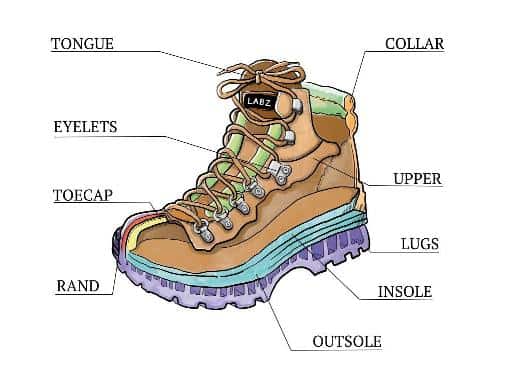
6. Gusseted tongue – It’s a name for tongue connected to the upper to prevent dirt, small rocks, water and debris we’ll find on-trail from getting inside the boot.
7. Rands – A tough guard made of rubber located either just in the front or all around the outer edge. It’s there to reinforce the most impacted areas of the boot. It both increases the life of your footwear and adds more toe protection. They can come with a “toe rand”, which is a toe cap also made of rubber.
8. Linings – GoreTex is a hard-core waterproof membrane. It offers some breathability but your feet will still sweat in high temperatures and direct sunlight. Linings with moisture wicking tech like Dri-Lex or Cambrelle are our best bet for water-resistance with added ventilation. They’ll often come with anti-microbial treatment for preventing odors.
9. Padded collar – Thick hiking collars ensure proper comfort and ankle support on the trail.
HOW CAN I TEST MY BOOTS AT A STORE?
A smart hiker will ignore the appearance of the boot or how fancy the brand is. How well the boots adapts to your foot shape is much more important.
Let’s go over a few ways to test if the boots are made for your feet:
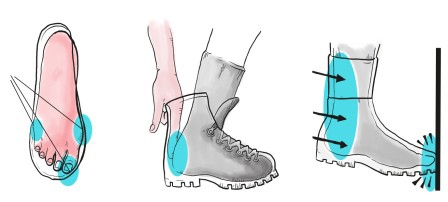
1. The finger test – This is also the beginning of a proper fit testing. Put the boot on, leave it unlaced and try to slide your finger behind your foot. It should fit right in.
2. The sensory test – You’ll have to put your bare foot into your boot of choice for this one. Try and feel all the places where the boot feels tight (if any). You can’t really do this properly with socks on.
*note: Focus especially on the small toes and the big toe bone and if you feel pinching or pressure there.
3. The stride test – What happens with the boots while you’re walking? Does the top break as it should or jamming the area behind your toes too much? Is the heel moving together with the boot or sliding around? If your heel and the boot moving as one, the boots are too large and will cause blistering.
4. The test on the slant board – To top it all off, ask the salesman for a slant board. We must test how the boot performs on an incline. Try walking down and see how it feels. If your toes are touching the front, ask for a half size bigger pair. If they’re jammed, move on to the next model.
HOW TO FIT HIKING BOOTS- 9 TIPS
“Fit is king,” say the hikers. These are the steps we want to follow to choose the right fit:
1. Make sure it’s, at least, late in the afternoon (evening is more preferable, though). Our feet will expand during the day, so the best time to shop for hiking boots is when they’ve reached their full size.
2. Test the boots wearing your favorite socks
3. Include your orthotics
4. Compare your feet to the footbed
5. Slip your finger between the heel of the boot and the back of your foot. It should get there, no problem, if the fit is right
6. As you lace up, you foot should start moving
7. Your toes should have enough room at all times. They also shouldn’t be touching the front of the boot
8. See how they feel once you make a couple of steps
9. We don’t want any rubbing against your heel
HOW TO CHECK BOOT QUALITY IN THE STORE
Going with the famous brands is one way of determining quality because they have their name to live up to. But fancy logo doesn’t mean the boots are your match. We need to dig a bit deeper.
So here you have some tips for checking boot quality in the store:
- Check the stitching. We don’t want to see any loose threads or missed stitches.
- The connection between the sole and the upper should be tight and solid, without loose or weak spots.
- The leather should be smooth all over, without thin spots, uneven edges, cuts or abrasion.
- The thread (meaning lugs) should be solid, tough and thick. If it’s soft and spongy, it’ll wear quickly.
- We should opt for braided nylon laces instead of flat shoe laces. Eyelets should be durable and sturdy.
- Push your fingers against each other through the sole of the boot. They shouldn’t get anywhere near each other. If you can almost touch your fingers or get close to that, the soles are too thin, therefore not protective enough
- Try to wring the boot like a towel. If you can twist it, the midsoles are too soft and not doing their job
- Check the heels. We want tough and firm rather than soft and squishy
TIME FOR ADVENTURE!
I hope this little guide takes you to your “golden slippers”.
Just ask yourself these questions with every pair you think might be the one, and if it answers them correctly, we have our match made in Heaven.
Choose smartly, stay safe and see you on the trail.
When it comes to choosing hiking boots, I’m always about functionality. Not fashion.
Absolutely. What model of boots do you normally use?
Correct sizing is so important! Especially for higher mileage days. Feet definitely swell, especially when carrying extra weight on backpacking trips. I always make sure width is nice and roomy. From my day-to-day shoes I go up a half size for half marathon running shoes, but a full size for hiking boots for longer trips. The extra room is always warranted!
Nice graphics and tips 🙂
Great input. Thanks for sharing your tips!
You definitely can’t overstate the importance of good footwear. While I was in the Marines, I had an issue with my insoles (big mistake) on a 25-mile hump. By the time it was over, I had blisters that nearly covered the bottoms of my feet and it took every bit of my constitution to walk to medical.
Now I’m a huge fan of Merrell boots. I use the Chameleon trail shoes for nearly everything…mountain biking, running, hiking, climbing. Great shoes.
These days I almost always buy hiking boots or shoes (trailrunners) that feel maybe half a size bigger than what I need. Between socks and or swelling, I find it’s a good fit for me.